Tuesday, June 28, 2011

BOYCC Medallions- Glazed and finished!

I need to put up a post on the process that these Medallions went through, at BOYCC, but for now I want to show the glazes and explain the choices I made, before I forget! I tried to choose each glaze because of some connection with the person, or some aspect that would play up an aspect of the medallion itself.

(they were sculpted in a workshop at the Convention, and the students varied from amateurs to currently working artists)


Here is the group that I ended up glazing yesterday. There were more medallions, but a couple of the molds went home with their artists right after BOYCC, and Sue Sifton and Deb McDermott will be coming here and glazing theirs separately. So, these six are what we are looking at today.


Cynthia Perry sculpted "Foalie", a sweet little foal head that reminded me of a bronze medal. So, I chose "Patina" as a glaze, which is a matte 'stoneware' finish that I felt would play up the sculptural aspects of "Foalie". Hope you like her, Cynthia!


Jackie Arns-Rossi sculpted this delightful "Kitty". I had a hard time figuring out what glaze to use, because I don't know Jackie that well and the kitty didn't tell me what to use. So I used the Elemental "Blue Ridge", which has breaks of pink, mauve, and tan brown. It has a lovely feel to it, and the way it breaks in the low areas highlights the gentle detail of "Kitty".


Katie Younger-Gehrt sculpted "Happy Happy Koi Koi", a koi fish in a pond with water lilys. It reminds me of an antique Japanese piece of artwork, so I used "China Sea" crackle. You may not be able see the crackling, but it is there and the glaze pools darker in the deep areas. I applied an extra layer to the water areas to enhance this effect slightly.


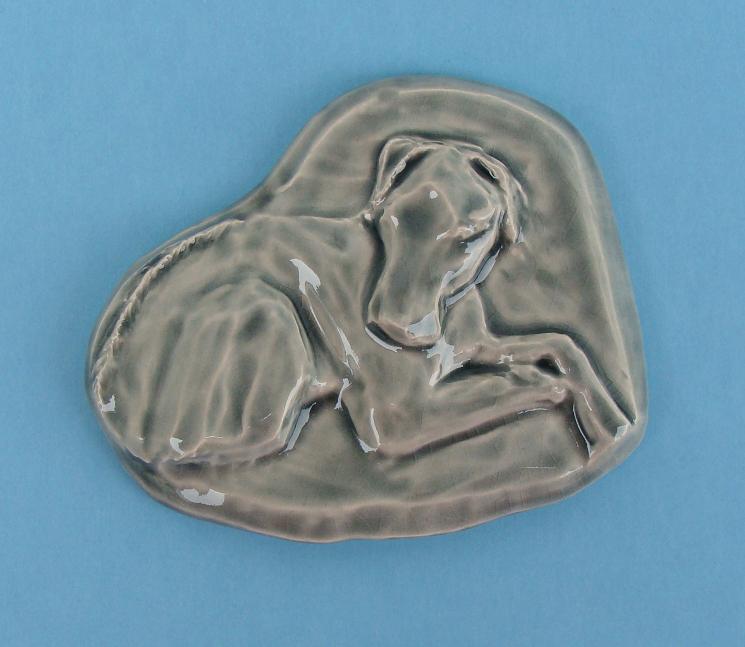
Kim Bjorgo-Thorne sculpted this Rhodesian Ridgeback dog, "Dugu", and to play up the very loose and sculptural aspects of the medallion, I used a combination of "China Sea" and "Mocha Cream" crackles, which made an almost granite like color and a crackled finish.


Kim Knight sculpted this foal head, and since Kim is a geologist, I chose "Smokey Agate" as a glaze. Agate, the mineral, gets "smokey" in the vicinity of radioactivity which makes the tips of the crystals darker than the base. It was one of my favorite minerals when I was collecting them, and I hope Kim likes the finished result!


Melanie Miller sculpted this horse head with a Celtic knot design around the rim, and I wanted to play up the delicate design with an art glaze. I chose "Peacock" because it was a favorite color when I used to do PH awards. "Peacock" lays darker in the deep spots and is also semi translucent, so it shows off the delicacy of the sculpture.

These medallions, from start to finish, have been an interesting journey for both the artists and the workshop leaders, and finally for me, as I was able to cast and glaze them. Thanks also to Deb McDermott and Sue Sifton, who came and helped to cast and clean them for a very fun day!

Tuesday, June 7, 2011

Jeanene's Stormwatch, the most difficult glaze job

This is Jeanene's Stormwatch, who was featured in an article in The Boat (the e-zine of Realistic Equine Sculpture Society) These process photos were shot in the workshop, where light is not ideal, but they do give an idea of what it looks like to underglaze a horse of this magnitude. The yellow is latex, the blue is painters tape. His light areas are masked off, then the body color is built up in underglazes. The dark areas are done first, to give the dappled effect. Then light colors are applied over the top, still raw. Let's take a peek...


A spray of French Brown all over, giving me something to dapple into.


Going between adding more underglaze color, and dappling off color with a typewriter eraser. Back and forth.


Dappling is finished, and any little debris is carefully brushed off.
Color is applied over the dappling, varying over the horse to give a shaded appearance.


The latex and painters tape are removed, and the edges are carefully gone over with an exacto and an eraser, to clean up and smudge the edge in some cases. Look carefully at the edges of the mane in the photo below. You can see that the mane tips are not cleaned up yet. There is still paint where it should be white. All of that is removed with an exacto blade... the mane alone took hours to do. The tail.... even worse.


He goes in the kiln at this point, to set these colors. Everything up until now has been worked on RAW, easily smudged, and difficult to see what has been applied underneath...


The hooves are detailed.

Tail is re-latexed, to allow spraying color on the leg. Reapplying the latex is an iffy proposition sometimes... it can remove color, or it may not match up.

Face is detailed, eyes painted, nostrils reddened, teeth yellowed...

Mane is now sprayed with color and shading.


Starting to spray the final glaze, which is going to be the clear glassy coating on top of the color. It is tinted green so that you can see it, and so that you can tell which glaze it is (satin or glossy, etc) The green is just food coloring and will burn off quickly.

At this point, with the glaze over the front end, I could hold the front end and spray color on the tail, though there is no photo of that part. I sprayed the mane and tail with varying yellows, taupes, and greys.
Bye bye color! When you reappear, it will be too late to fix anything... fingers crossed...


Success! His name is Enki, because like most Stormys, he is named after a weather god.

If you do this sort of work, you will know how sweaty under the armpits I was when I put him in the kiln, and what a sleepless night I spent waiting to see if it worked. :)And it did work. Enki was a record breaking price at auction.

Stormy being cast, more pictures

His mold has a lot of itty bitty goofy hand formed pieces, which make it complicated to demold. Not only could I not have made this mold ten years ago, I doubt that I could have demolded this horse ten years ago and put him back together!


Stormy being cast

These photos were randomly in with the glazed Stormys, so here are just a few views of a Stormy being cast. His hind leg/tail, plus six fly away pieces from his forelock, mane and tail are all cast in separate molds. Once he is cast, and I start assembling him, it takes a full eight hours to finish putting one together and sitting him down to dry.


When I run across more pictures of the casting process, I will post them.

Another Stormy

I always liked the head shot of this guy:


And then some in-progress shots of Elli's Stormy, the intensive scritchy roany one:


Note how the last photo shows the chest only half done. It tooks WEEKS of hand numbing work to scritch this guy. After scritching an area, I would go back in a day or two and do some more, to take away the 'pattern' that you tend to fall into when doing repetitive work. Finally, gave him a good all over look to blend any areas that needed more roaning. My hand still hurts just looking at the photos!

Some Stormwatch photos

Following a discussion on Breakables about Maggie's Stormy, I thought I might put up some photos of other Stormys that I have finished. (They have all been spoken for, but they have not all been finished yet. They take me a long time and I can't do them back to back :))
First is one that I wish I had a better picture of, he is the Stormy that I did for Karen Grimm when she came and tiled my kitchen floor. She bought the supplies, we did the work together,and I made the horse for her in trade. Of course, Karen loved Appaloosas, so he is a few spot Appy. He is much prettier with a blue or colored background, but I didn't have time to take more pic before he went home with her. He is the only Stormy that I didn't give a name to before he left.


He is also in a satin finish, unusual for a Stormwatch. Karen passed away from cancer, in May.

Joanie